
Porcelain tiles are currently considered one of the most desired floors in the construction market. One of the main reasons is the combination of beauty and practicality when cleaning it, in addition, it is resistant and has numerous possibilities of colors and sizes.
If you are thinking of putting it in your home and have some doubts on how to do it, in this article we will give you tips for how to settle eight types of porcelain tiles many different. To solve all these doubts, continue reading the following text!
Essential materials for laying any type of porcelain tile
Before you proceed with the tips, be sure to separate or purchase the following materials so that you are effective in your result:
- Rubber performance;
- Toothed steel run-out;
- Wooden compass;
- PVC or rubber mallet;
- Chopping hammer;
- Torquês;
- Spacers;
- Ceramic plate separator;
- Hydrographic pen;
- Metallic square;
- Bob;
- Mason pencil;
- Trowel;
- Ceramic plate marker;
- Mortar;
- Volume meter;
- Measuring tape;
- Piassava broom;
- Level hose;
- Aluminum ruler;
- Mortar box.
Cleanliness is important first of all
Before starting any of the reporting procedures, how to set porcelain tiles, one of the essential factors for success is cleaning prior to the process.
It is essential not to forget to leave the subfloor or the walls very clean, eliminating any and all existing imperfections. Clean the area with the piassava broom and, if there are no puddles or lumps on the surface, ready: time to put the porcelain tiles!
How to fit porcelain tiles on a wall
You must be thinking: porcelain on the wall? Yes, it is possible! Check out the step by step of this technique below:
- Place the mortar already moistened, in the proper box;
- As recommended by the mortar manufacturer, add clean water;
- Mix with the trowel until the mortar is homogeneous and consistent;
- Wait 15 minutes until the mortar reaches the maturation point – use this time to clean the board with a damp sponge;
- Check the wall level;
- Do not forget to do the cleaning process as explained in the topic on hygiene;
- If the mortar is too dry, moisten it very quickly;
- Spread the mortar on a small part of the wall using the smooth side of the trowel – attention: the amount of mortar used depends on the performance of each professional;
- Take the trowel, applying the mortar on the back of the floor;
- With the toothed trowel, pass through the entire porcelain tile;
- Set the first plate according to the modulation;
- Don’t forget to put the mortar on the corner of the wall too;
- The mixture of mortar on the back of the floor with the junction of the mortar on the wall will assist in the “glue” of the porcelain tiles on the wall;
- With the rubber hammer, tap the corners of the plate. And then hit the middle.
- Wait 72 hours to apply the grout;
- It is important that at that time the wall is « resting » to be grouted smoothly. Also, because of the piece of porcelain that can be released over time.
How to lay porcelain tiles 60X60
Laying 60 by 60 cm porcelain tiles is one of the easiest processes as it is one of the smallest slabs. Want to know more? Just follow our tips below!
- Place the mortar in a previously moistened box;
- Add clean water to the box with the mortar;
- Make the mixture with the trowel until the mortar is completely mixed and consistent;
- Wait for 15 minutes until the mortar reaches the point of maturation – remembering that this is the time to sanitize the board with a damp sponge;
- Check the level of the subfloor. Use the mason’s pencil and the measuring tape mark a point 1 meter above the subfloor;
- Using the level hose, mark the second point;
- Sweep the floor – as instructed in the topic on cleaning before placing mortar;
- If the mortar is dry, moisten it slightly;
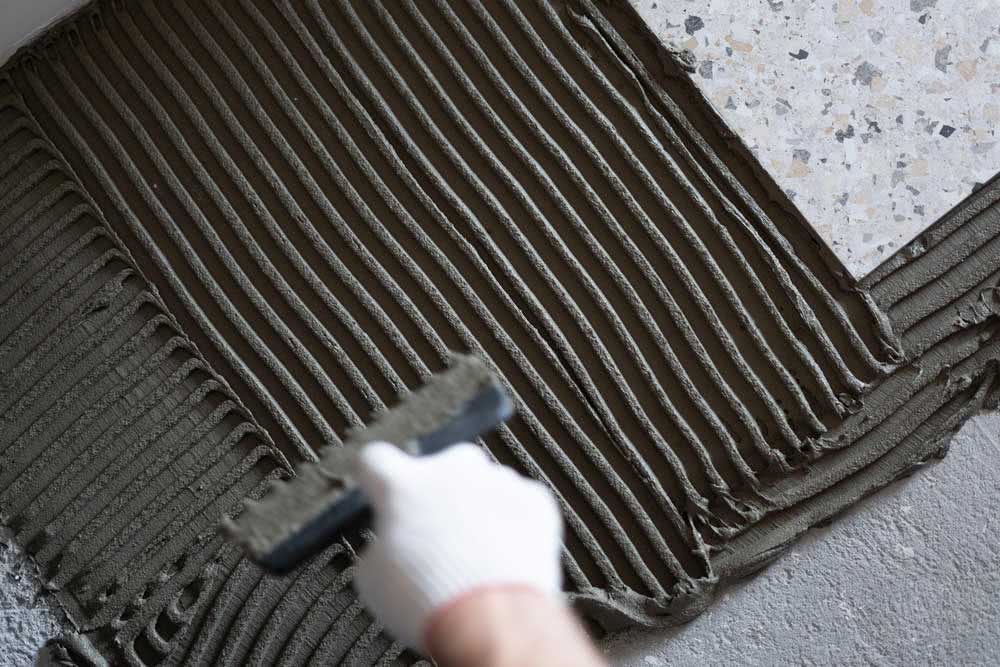
- In a small section of the subfloor, spread the mortar, using the smooth side of the trowel;
- With the toothed side of the trowel, pass over the surface, at an angle of inclination of 60 ° in relation to the subfloor;
- Return with the trowel and apply the mortar to the non-enameled part of the piece;
- Now with the toothed trowel, run the entire length of the plate;
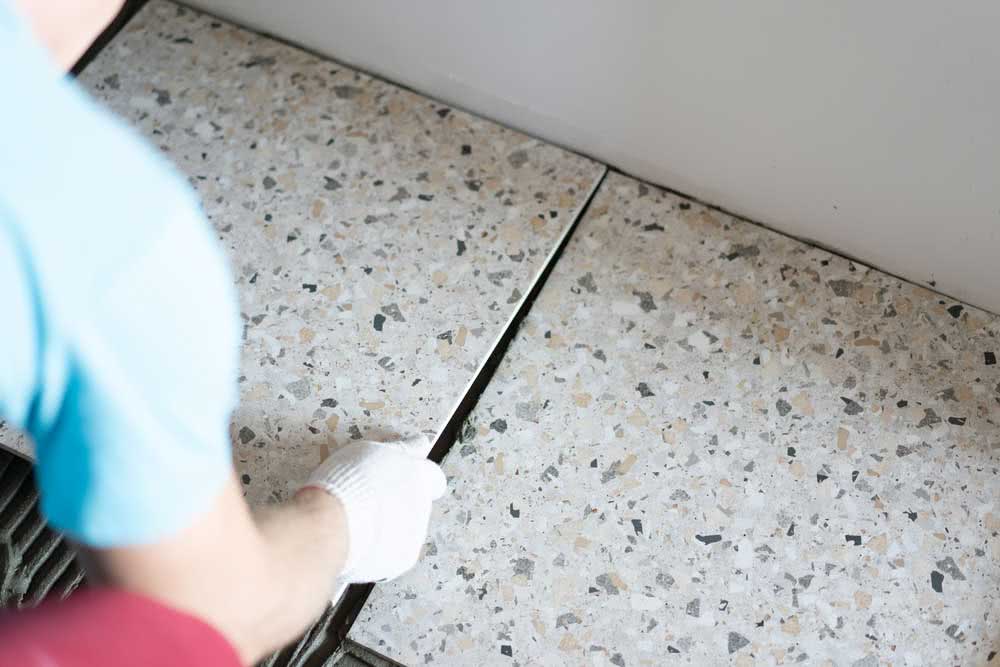
- Lay the first porcelain tile according to the modulation. Attention that this piece must be placed in the place of greater visibility of the environment, thus avoiding cuts in the place;
- Hit the corners of the board with the rubber hammer. Follow the same in the middle, until the mortar strands are kneaded;
- Without settling, place a reference plate on the other end of the subfloor;
- At the apex of the first plate, attach a steel nail;
- At the other end, attach another nail to the apex of the plate. Tie the nylon thread tightly between the nails;
- Fix a perpendicular line and check the square between them: the distance between the line and the vertex must be 1 millimeter.
- Repeat the same previous procedures to place other cards;
- Place spacers between the porcelain tiles according to the engineering company or ceramic manufacturer;
- At the vertices, also insert the spacers;
- Ready! Wait 72 hours to grout the entire floor.
How to set rectified porcelain tiles
Because of the advantages of spaciousness, ease of cleaning and superior finish, many people end up choosing rectified porcelain tiles. In fact, compared to laying “bold ” and the rectified one, there is not much difference in what was previously mentioned.
However, there are some points to highlight below:
- You are able to seat the pieces with a greater proximity between them;
- Because of this detail of the right angle, it is easier to “fit” one plate to the other, reducing the working time and unwanted effects;
- The use of grout is much lower than in the common type of porcelain tile;
- The straight line supports the idea of continuity on the floor, creating the feeling of the environment being larger than it really is.
How to fit rectified porcelain tiles on the wall
Do you have any questions how to set porcelain tiles rectified on the wall? Go back to the instructions on how to set porcelain tiles on the wall as the steps are exactly the same.
However, always remember that the rectified plates even on the wall:
- They are easier to be placed and with greater approximation due to the angle of 90 degrees;
- The execution of the work is in less time, since they are straight plates. This is also a decisive factor for effective work and avoiding material losses;
- The grout that will be used is reasonably less than if it were a porcelain tile without grinding.
How to lay porcelain tiles 70 × 70
Many people are afraid of laying larger porcelain tiles, such as 70 by 70 centimeters. But the process to be carried out is exactly the same as described in the part of “how to lay 60 × 60 porcelain tiles” located above that topic.
But keep an eye out for these tips:
- Because they are larger pieces, they are heavier. Be careful when handling them;
- The mortar usually dries very quickly, so the agility in the laying must be doubled so that there is no rework;
- One of the advantages, on the other hand, is that as with the rectified plates, the use of grout is less;
- Less grout, more economical product and easier to clean.
How to lay large format porcelain tiles

The processes to be carried out for laying large format porcelain tiles are the same as those described in the other topics. However, we have some differences:
- The laying must be done in the double layer system: applying adhesive mortar to the base and back of the board;
- It is essential that the work is carried out by a team, since one person alone cannot handle the piece;
- The application of the pieces must be at the base, pressing until the kneading of the cords is achieved;
- The use of the rubber hammer is essential in this procedure;
- Attention to the care in handling the plates, after all the bigger, the heavier;
- One of the great advantages is the reduced use of grout as a finish.
How to lay porcelain tiles of a meter
Because of the great added value in its use, one-meter porcelain tiles such as large-format porcelain tiles are the most desired by many construction and decoration professionals, as well as property owners.
To seat this one meter piece, you must follow the steps already mentioned in the topic of how to seat 60 by 60 pieces. But as in any other case with your specifications, some tips should be followed:
- The porcelain boxes must be transported with care, so that there is no damage. It is important to emphasize that these pieces are usually very heavy;
- As in the topic above, remember that a team is needed to install the porcelain tiles because they are extremely heavy;
- Use of suction cups and other equipment are indispensable for excellence in the result;
- Large parts must have a specialized workforce involved, exactly so that the result is as expected, but also so that it can reduce the costs involved in the operation;
- In addition to the question of leveling mentioned in the topics of porcelain tiles on the wall and 60 by 60 centimeters, attention with cracks in the subfloor: remember that these tiles have a very high cost and any errors in that part, you may have a loss of three times its initial cost;
- In addition to ease of cleaning, the low use of grout, the unique beauty in porcelain tiles over 1 meter in size compensates for all the work involved, with a result of pure sophistication.
How to install porcelain tiles in the bathroom
Laying porcelain tiles in the bathroom follows the same procedures as explained in the previous topics: “how to set porcelain tiles on the wall” and “how to set porcelain tiles 60 × 60”. But as already seen in each of the topics present, this process has some differences:
- The porcelain tile can be installed in any part of the bathroom: floor, walls, countertops or, even, make a mix with other ceramic types;
- Adhesion is an important factor to highlight in the porcelain tiles to be used within the box shower: due to the safety factor, since the floor cannot be slippery.
Beauty versus difficulty
There is no way to say that lay porcelain tile it is not one of the easiest tasks in civil construction, but with a lot of research, acquiring the right materials and with the advice of a high-excellence tile maker; you will have all the support you need so that you can do the job yourself.
Still, what part do you find most difficult in the process of lay porcelain tile? Comment below so we can learn more!


